- Published on
如何设计一个Toast组件?
- Authors

- Name
- Deng Hua
目录
需求收集
功能需求
功能需求包含了组件基本需求的所有功能
类型定义 (Notification Types)
组件需要基本类型,如
success,error,warning等自定义 (Customization)
能够自定义Toast,如Toast的持续时间(
duration),文本(text)等动画 (Animation)
动画的贝塞尔曲线,如
fade in和fade out,slide等定位 (Position)
Toast可以在很多位置进行显示,如
left/right,bottom,top的各类组合等。关闭按钮 (Close Button)
通知上应有一个关闭按钮,以允许用户手动关闭。默认提供一个持续时间,时间结束自动关闭。
堆叠时行为 (Stacking Behaviour)
通知应向上或者向下折叠,如通知位于顶部,则向下堆叠。如果位于底部,则向上堆叠。
通知队列 (Notification Queue)
同时触发多个通知,应该排队并一个接一个地显示。
非功能需求
并不直接影响到主要功能的需求
性能(Performance)
轻量且高效,确保多个通知同时显示也能显示流畅
可访问性(Accessibility)
可供大量用户和大型用户访问,且无论任何设备。如屏幕上此时有一个Toast,此时按下Tab键,焦点应该转到Toast的关闭按钮上,这样我们可以通过Enter键手动关闭它。 这样就不需要使用鼠标。
用户体验(User Experience)
兼容性(Compatibility)
兼容不同类型的现代浏览器
可扩展性(Scalability)
未来可以在原组件基础上增加更多新功能。
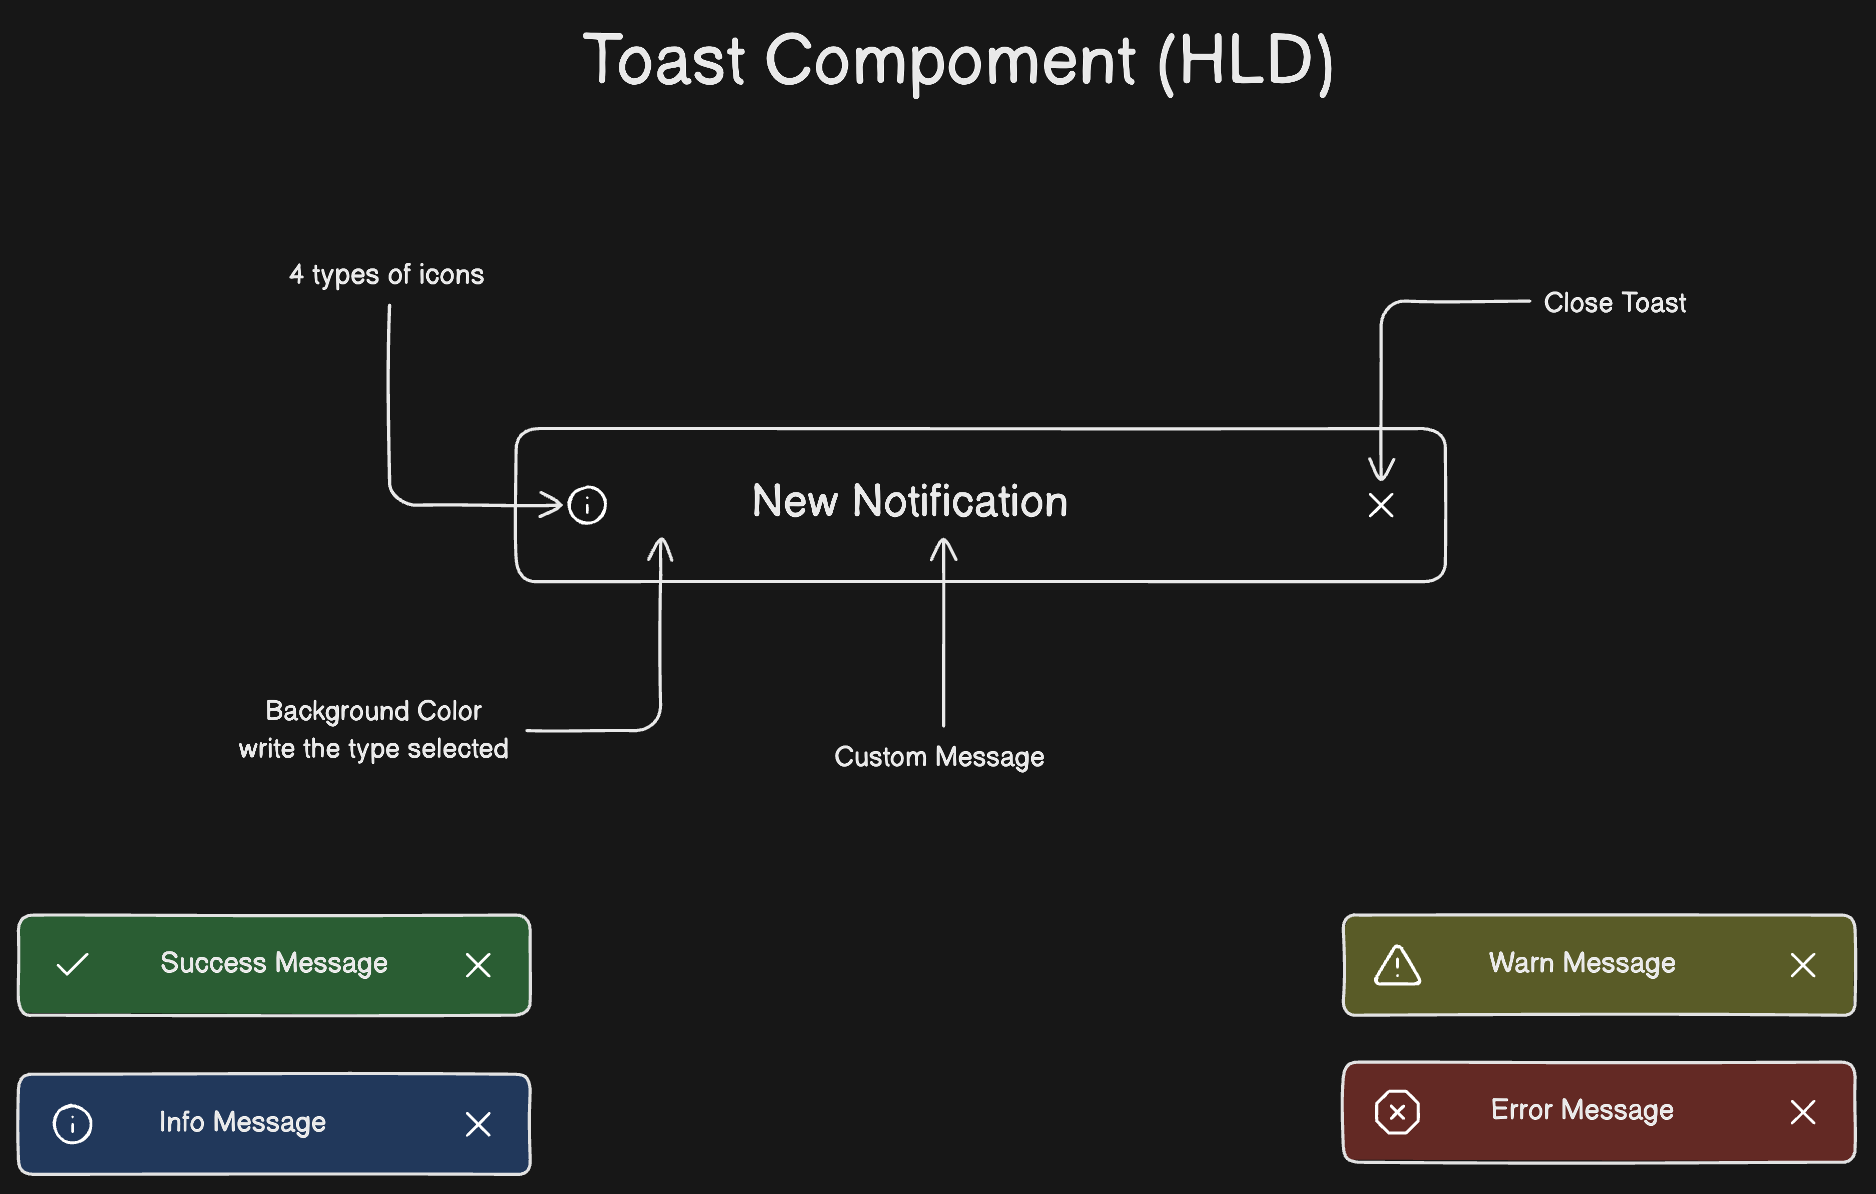
Toast Component (HLD)
高阶设计 (HLD High Level Design) 解释了用于开发系统的架构。架构图提供了整个系统的概述,标识了将为产品及其接口开发的主要组件。 HLD 可以使用系统管理员应该能够理解的非技术性到轻度技术性术语。相比之下,低级设计进一步公开了每个元素的逻辑详细设计,以供工程师和程序员使用。 HLD 文档应涵盖软件和硬件的计划实施。

编码
本示例将使用自定义Hook函数触发Toast组件。
目录示意: 
import {
  AiOutlineCheckCircle,
  AiOutlineClose,
  AiOutlineCloseCircle,
  AiOutlineInfoCircle,
  AiOutlineWarning,
} from "react-icons/ai";
import "./notification.css";

const iconStyles = {marginRight: "10px"};
const icons = {
  success: <AiOutlineCheckCircle style={iconStyles} />,
  info: <AiOutlineInfoCircle style={iconStyles} />,
  warning: <AiOutlineWarning style={iconStyles} />,
  error: <AiOutlineCloseCircle style={iconStyles} />,
};

const Notification = ({type = "info", message, onClose = () => {}}) => {
  return (
    <div className={`notification ${type}`}>
      {/* icon */}
      {icons[type]}
      {/* message */}
      {message}
      {/* close button */}
      <AiOutlineClose
        color="white"
        className="closeBtn"
        onClick={() => onClose()}
      />
    </div>
  );
};

export default Notification;
.notification {
  padding: 15px;
  margin: 10px;
  color: white;
  display: flex;
  align-items: center;
  border-radius: 5px;
  box-shadow: 0 2px 4px rgba(0, 0, 0, 0.2);
  font-family: sans-serif;
}

.success {
  background-color: #4caf50;
}
.info {
  background-color: #2196f3;
}
.warning {
  background-color: #ff9800;
}
.error {
  background-color: #f44336;
}

.closeBtn {
  margin-left: 5px;
  cursor: pointer;
  display: flex;
  align-items: center;
}

.top-right {
  position: fixed;
  top: 20px;
  right: 20px;
}

.top-left {
  position: fixed;
  top: 20px;
  left: 20px;
}

.bottom-right {
  position: fixed;
  bottom: 20px;
  right: 20px;
}

.bottom-left {
  position: fixed;
  bottom: 20px;
  left: 20px;
}
创建useNotification钩子函数使用Toast组件:
import {useCallback, useState} from "react";
import Notification from "../components/notification";

const useNotification = (position = "top-right") => {
  const [notification, setNotification] = useState(null);

  let timer;

  const triggerNotification = useCallback((notificationProps) => {
    clearTimeout(timer);
    setNotification(notificationProps);
    timer = setTimeout(() => {
      setNotification(null);
    }, notificationProps.duration);
  }, []);

  const NotificationComponent = notification ? (
    <div className={`${position}`}>
      <Notification {...notification} />
    </div>
  ) : null;

  return {NotificationComponent, triggerNotification};
};

export default useNotification;
在App.jsx中使用useNotification钩子函数。
import useNotification from "./hooks/use-notification";
import "./App.css";

function App() {
  const {NotificationComponent, triggerNotification} =
    useNotification("top-right");

  return (
    <div className="App">
      {NotificationComponent}
      <h1>Toast Component</h1>
      <div className="btns">
        <button
          onClick={() =>
            triggerNotification({
              type: "success",
              message: "This is a success message!",
              duration: 3000,
              animation: "pop",
            })
          }
        >
          Show Success
        </button>
        <button
          onClick={() =>
            triggerNotification({
              type: "info",
              message: "This is an info message!",
              duration: 3000,
            })
          }
        >
          Show Info
        </button>
        <button
          onClick={() =>
            triggerNotification({
              type: "warning",
              message: "This is a warning message!",
              duration: 3000,
            })
          }
        >
          Show Warning
        </button>
        <button
          onClick={() =>
            triggerNotification({
              type: "error",
              message: "This is an error message!",
              duration: 3000,
            })
          }
        >
          Show Error
        </button>
      </div>
    </div>
  );
}

export default App;
Example
End.